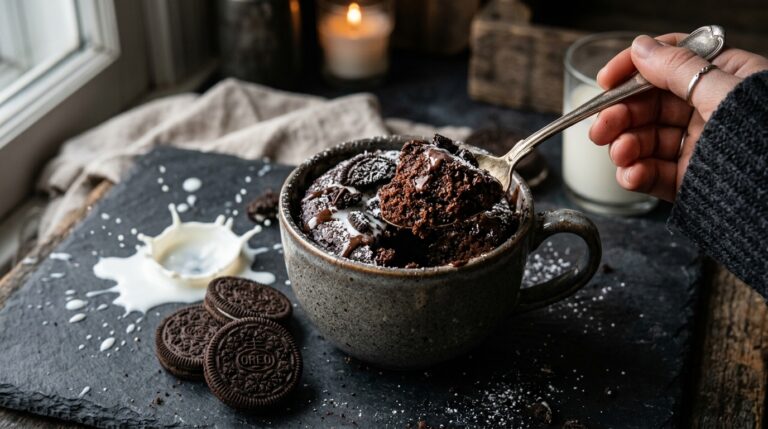
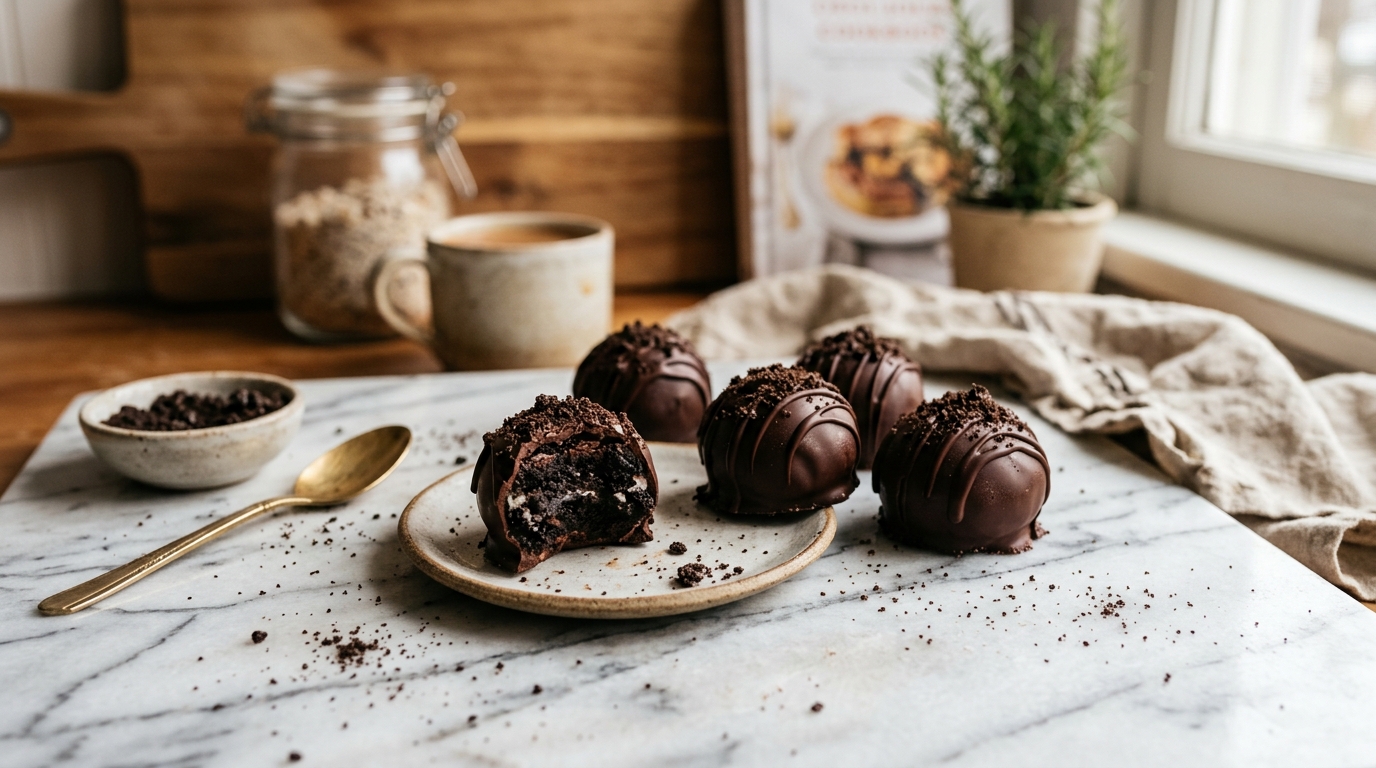
Lazy 3-Ingredient No-Bake Oreo Truffles
Are you looking for a show-stopping, gourmet-looking dessert that requires absolutely zero baking skills, no oven, and only three basic ingredients? Welcome to the magic of the Viral Lazy 3-Ingredient No-Bake Oreo Truffles. 🍫🍪
Whether you need a last-minute dessert for a holiday party, a sweet treat for a weekend movie night, or an aesthetic homemade gift for a friend, these rich, bite-sized chocolate truffles are the ultimate culinary hack. By crushing classic Oreo cookies and binding them with creamy, tangy cream cheese, you create a dense, fudgy, cheesecake-like center. Enrobe that in a crisp shell of melted chocolate, and you have a masterpiece that looks and tastes like it came from a high-end chocolatier.
The best part? You can make an entire batch in your kitchen with almost no effort. Prepare to be asked for the recipe by everyone who tries one!
Where Did the Oreo Truffle Trend Originate?
Oreo truffles (often referred to simply as “Oreo Balls”) have been a beloved secret weapon for busy moms and holiday bakers for well over a decade. The original recipe was frequently shared on recipe cards and old-school food blogs as a clever way to make cheap, bulk holiday treats.
However, the modern explosion of this recipe is entirely thanks to TikTok and Pinterest aesthetics. Food creators realized that this incredibly simple, nostalgic recipe could be elevated visually. By experimenting with different chocolate drizzles, edible glitter, and perfectly uniform shapes, the internet transformed a humble potluck dessert into a viral, aesthetic sensation that dominates social media feeds every single holiday season.
Why You Will Fall in Love With This Recipe
- 100% No-Bake: You never have to turn on your oven. The entire recipe relies on a food processor, a microwave, and your refrigerator.
- Only 3 Ingredients: You literally only need a package of Oreos, a block of cream cheese, and some melting chocolate. It is the ultimate budget-friendly dessert.
- Looks Ridiculously Fancy: Despite being “stupidly easy” to make, the smooth chocolate coating and crushed cookie garnish make these truffles look incredibly professional and expensive.
- Kid-Friendly Fun: Because there is no hot oven involved (just melting chocolate), this is a fantastic, safe, and messy recipe to make with kids.
What You Need (Ingredients & Dietary Swaps)
The simplicity of this recipe means that ratios are important. Here is exactly what you need for the perfect texture:
- 1 Standard Package of Classic Oreos (14.3 oz): Do not use “Double Stuf” or “Mega Stuf” Oreos! The extra cream filling will make the truffle batter too wet and greasy to roll properly. Stick to the classic, standard cookies.
- 8 oz Cream Cheese (1 Block): Full-fat cream cheese works best for that rich, cheesecake-like flavor. Crucial: It must be softened to room temperature before mixing!
- 12 oz Dipping Chocolate: You can use high-quality chocolate chips (semi-sweet or dark), but “melting wafers” (like Ghirardelli or candy melts) are highly recommended because they melt thinner and harden into a perfect, snappy shell much faster.
Vegan and Gluten-Free Substitutions
- Make it Gluten-Free: Simply swap the classic cookies for a package of Certified Gluten-Free Oreos (widely available in most grocery stores).
- Make it Vegan/Dairy-Free: Classic Oreos are famously “accidentally vegan.” To make the entire recipe plant-based, swap the regular cream cheese for a vegan cream cheese alternative (like kite-hill or a soy-based brand), and ensure you are using certified dairy-free dark chocolate chips for dipping.
How to Make It (Step-by-Step Instructions)
- Crush the Cookies: Place the entire package of Oreos (cookies and the cream filling) into a food processor. Pulse them until they are reduced to fine, sandy crumbs. Pro-Tip: Save about 2 tablespoons of these dry crumbs and set them aside to use as a garnish later! (If you don’t have a food processor, put the cookies in a large ziplock bag and smash them with a rolling pin).
- Mix the Binder: Add the softened block of cream cheese directly into the food processor with the cookie crumbs. Pulse again until the mixture clumps together into a dark, thick, cohesive dough.
- Roll and Chill: Line a baking sheet with parchment paper. Use a cookie scoop or a spoon to portion the dough, rolling it between your hands into smooth, 1-inch balls. Place them on the baking sheet.
- The First Chill (Crucial Step): Place the baking sheet into the freezer for exactly 15 to 20 minutes. The balls must be firm and cold before dipping, otherwise, they will fall apart and melt into the hot chocolate.
- Melt the Chocolate: In a microwave-safe bowl, melt your chocolate wafers or chips in 30-second increments, stirring vigorously between each session until perfectly smooth and glossy.
- Dip and Decorate: Take the cold truffles out of the freezer. Drop one truffle into the melted chocolate. Use a fork to roll it around until coated, lift it out, and tap the fork gently against the edge of the bowl to let the excess chocolate drip off. Place it back on the parchment paper.
- Garnish: Immediately sprinkle a pinch of your reserved crushed Oreos on top of the wet chocolate before it hardens. Repeat with the remaining truffles.
- Set and Serve: Place the tray into the refrigerator for 10 minutes to allow the chocolate shell to harden completely. Serve chilled and enjoy!
Expert Pro-Tips for Perfect Truffles
- The Fork Trick: Never use a spoon to dip your truffles; it will pick up too much chocolate and create a messy “pool” around the base of your truffle. Use a standard dinner fork, which allows the excess chocolate to drip through the tines.
- Keep Them Cold: If your kitchen is warm and your truffles start to get soft or sticky while you are dipping them, pause and put the tray back into the freezer for 5 minutes. Dipping warm truffles will ruin your chocolate!
- Add Flavor Extracts: Want to level up? Add half a teaspoon of peppermint extract to the cream cheese mixture for a holiday mint truffle, or a splash of vanilla extract to enhance the chocolate flavor.
Storage and Freezing Instructions
- To Store: Because these truffles contain cream cheese, they absolutely must be kept refrigerated. Store them in an airtight container in the fridge, where they will stay fresh and delicious for up to 2 weeks.
- To Freeze: These are incredibly freezer-friendly! You can freeze the fully decorated truffles in a ziplock bag or container for up to 3 months. Many people actually prefer eating them straight out of the freezer for a colder, firmer bite!
Frequently Asked Questions (FAQ)
Why is my chocolate clumping up and getting thick when I melt it? This is called “seizing,” and it happens if your chocolate overheats or if water gets into the bowl. To fix thick chocolate, stir in 1/2 teaspoon of coconut oil or vegetable oil to thin it out and make it pourable again.
Can I use Golden Oreos or Mint Oreos? Yes! This recipe is incredibly versatile. Golden Oreos taste like a birthday cake truffle, and Mint Oreos taste like thin mints. Just remember to stick to the standard versions, not the Double Stuf ones.
Do I need a food processor for this? No, a food processor just makes it faster. You can easily crush the cookies in a sealed plastic bag with a heavy pan or rolling pin, and then mix the softened cream cheese in by hand using a sturdy spatula or a hand mixer.