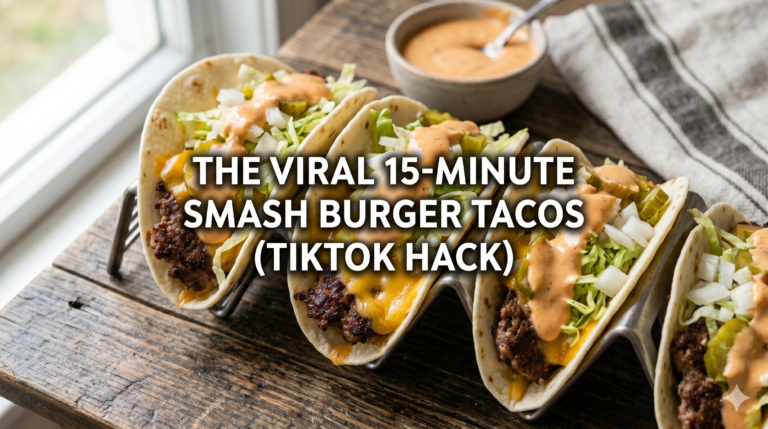
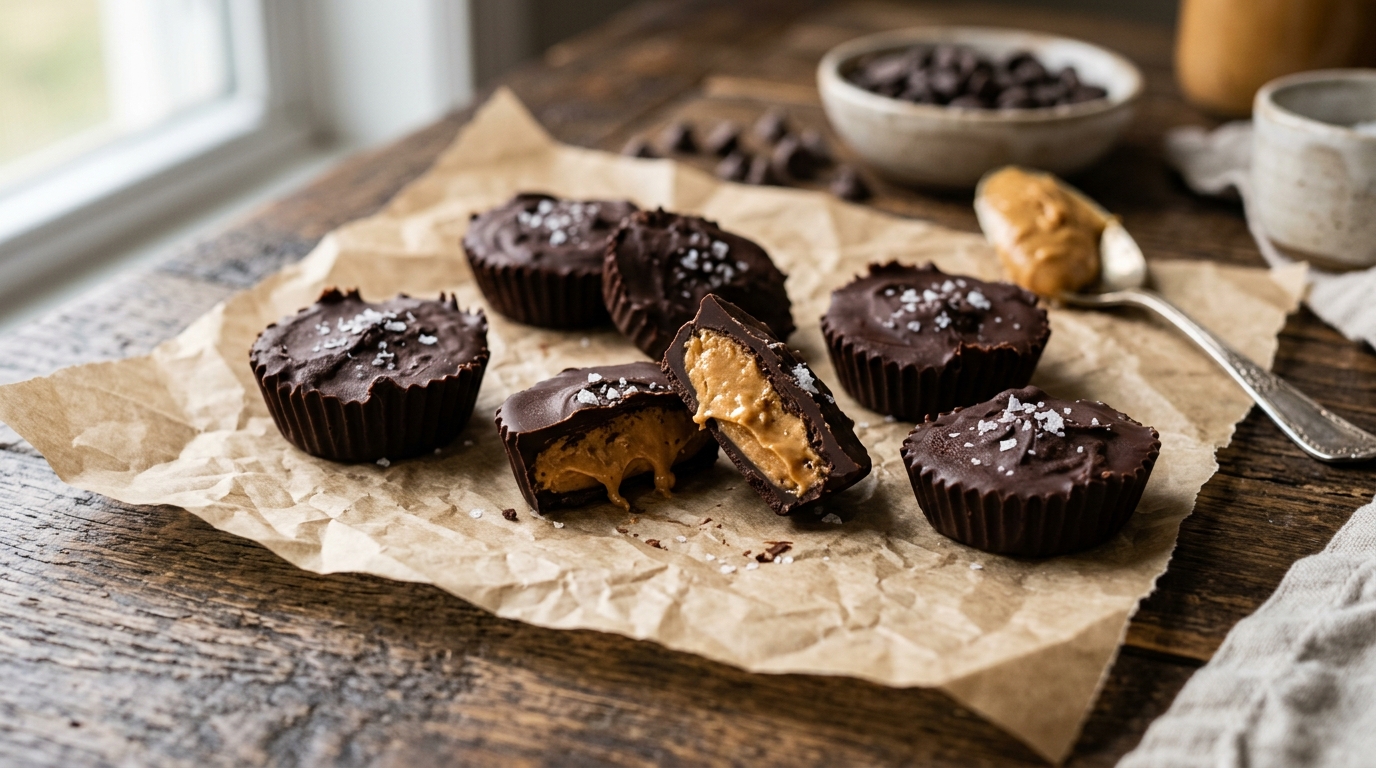
Lazy 3-Ingredient Homemade Peanut Butter Cups (No-Bake)
Are you craving a rich, chocolatey, peanut-buttery treat but absolutely refuse to turn on your oven? Do you love the classic taste of store-bought Reese’s Peanut Butter Cups but want a healthier, preservative-free version you can make right in your own kitchen? You are in exactly the right place. Welcome to your new favorite sweet treat: the Lazy 3-Ingredient Homemade Peanut Butter Cup. 🍫🥜
This incredible no-bake dessert hack has been taking over TikTok and Pinterest because it perfectly satisfies that sweet tooth with almost zero effort. You do not need any baking skills, special equipment, or a long grocery list. With just three basic pantry staples, a muffin tin, and your refrigerator, you can create a gourmet, aesthetic, and completely customizable batch of peanut butter cups that taste vastly superior to anything you can buy in a wrapper.
Where Did This Homemade Candy Trend Come From?
While peanut butter and chocolate have been a legendary flavor combination for a century, the trend of making them at home with only three ingredients exploded recently thanks to the health and wellness community on social media.
Fitness influencers, keto dieters, and busy parents started looking for ways to enjoy their favorite candies without the added refined sugars, artificial preservatives, and palm oils found in commercial candies. By stripping the recipe down to just high-quality chocolate, natural peanut butter, and a touch of coconut oil for texture, the internet proved that making “candy” at home is actually incredibly easy and significantly healthier.
Why You Will Fall in Love With This Recipe
- Stupidly Easy (100% No-Bake): There is no flour, no eggs, no mixing bowls of batter, and absolutely no baking required. The hardest part of this entire recipe is just waiting for them to chill in the freezer.
- Only 3 Ingredients: You only need chocolate chips, peanut butter, and a little bit of coconut oil. It is the ultimate minimalist dessert.
- Healthier & Cleaner: Commercial peanut butter cups are loaded with refined sugars and stabilizers. When you make them at home, you control exactly what goes into them.
- Perfect for Meal Prep: These store beautifully in the freezer. You can make a large batch on Sunday and have a perfectly portioned, cold, snappy chocolate treat waiting for you every single night of the week.
What You Need (Ingredients & Healthy Substitutions)
To get that perfect snap of chocolate and a creamy, melt-in-your-mouth center, ingredient selection is crucial:
- 1 Cup Chocolate Chips: You can use dark chocolate, semi-sweet, or milk chocolate. Dark chocolate (70% cacao or higher) is highly recommended if you want a richer, more mature, and healthier flavor profile that balances the sweet peanut butter.
- 1/2 Cup Creamy Peanut Butter: Natural peanut butter (where the only ingredients are peanuts and salt) works beautifully. Avoid peanut butters with added sugars or stiff vegetable oils if possible.
- 1 Tablespoon Coconut Oil: This is the secret, magic ingredient! Adding a little bit of coconut oil to your chocolate before melting it thins it out, making it easier to pour. More importantly, it helps the chocolate harden into a perfect, snappy shell when chilled.
Vegan, Keto, and Allergy-Friendly Swaps
- Make it Vegan: Simply ensure you are using certified vegan/dairy-free chocolate chips.
- Make it Keto/Low-Carb: Use sugar-free, stevia-sweetened chocolate chips and an unsweetened, all-natural peanut butter.
- Nut Allergies? If you cannot eat peanuts, this recipe works flawlessly with almond butter, cashew butter, or even sunflower seed butter (SunButter) for a completely nut-free school-safe snack!
How to Make It (Step-by-Step Instructions)
- The Setup: Prepare a standard 12-cup muffin tin by lining it with paper or silicone muffin liners. (Pro-tip: Silicone liners are the best because the chocolate pops out effortlessly without sticking).
- Melt the Chocolate: In a microwave-safe bowl, combine your chocolate chips and the coconut oil. Microwave in 30-second bursts, stirring thoroughly between each interval. Do not overheat, or the chocolate will seize and become clumpy! It should be smooth, glossy, and pourable.
- Pour the Base Layer: Spoon about 1 tablespoon of the melted chocolate into the bottom of each muffin liner. Gently tap the muffin tin on your kitchen counter to flatten the chocolate into an even, smooth layer. Place the tin in the freezer for 5 to 10 minutes until the chocolate base is completely solid.
- Add the Peanut Butter Center: Remove the tin from the freezer. Spoon about 1 to 2 teaspoons of creamy peanut butter directly into the center of each hardened chocolate base. Use the back of a small spoon to flatten the peanut butter slightly, ensuring it doesn’t touch the paper edges (you want the top layer of chocolate to seal it in).
- Cover with Chocolate: Spoon the remaining melted chocolate over the peanut butter centers, making sure the peanut butter is completely covered and the chocolate reaches the edges of the liner. Tap the tin on the counter one more time to smooth the tops.
- Chill and Set: Place the muffin tin back into the freezer for 15 to 20 minutes, or into the refrigerator for 1 hour, until the cups are completely solid.
- Peel and Enjoy: Remove the liners, bite into that thick chocolate shell, and enjoy your aesthetic, homemade peanut butter cup!
Expert Pro-Tips for the Best Results
- The Sea Salt Upgrade: Want to make these taste like a $5 gourmet bakery treat? Right before you put the finished cups into the freezer for the final chill, sprinkle the wet chocolate tops with a little bit of flaky sea salt (like Maldon). The sweet and salty contrast is mind-blowing.
- Thin Out Thick Peanut Butter: If your natural peanut butter is too stiff or thick to spoon easily, microwave it for 10-15 seconds. It will become runny and much easier to drop into the center of your chocolate bases.
- Use a Double Boiler: If you don’t have a microwave or are worried about burning your chocolate, melt the chocolate and coconut oil in a glass bowl set over a simmering pot of water (a double boiler). This provides gentle, even heat.
Storage and Reheating Instructions
- To Store: Because homemade peanut butter cups do not have the artificial stabilizers that store-bought candies do, they will soften quickly at room temperature. You must store them in an airtight container in the refrigerator (where they will last for 2 weeks) or in the freezer (where they will last for up to 3 months).
- To Eat: If stored in the fridge, eat them immediately! If stored in the freezer, let them sit at room temperature for about 3 to 5 minutes before biting into them so you don’t hurt your teeth on the frozen chocolate.
Frequently Asked Questions (FAQ)
Can I use crunchy peanut butter instead of creamy? Absolutely! Crunchy peanut butter adds a fantastic texture to the center of the cups. You can also mix in some crushed peanuts, crispy rice cereal, or chia seeds into your peanut butter before adding it to the cups for extra crunch.
Why did my chocolate get hard and clumpy when I melted it? This is called “seizing.” It happens if the chocolate gets too hot or if even a single drop of water gets into the bowl. Always make sure your bowls and spoons are completely bone-dry, and only microwave in short 30-second bursts.
Can I make these in a mini-muffin tin? Yes! Mini muffin tins are actually perfect for making bite-sized peanut butter cups. The assembly process is exactly the same; you will just use smaller amounts of chocolate and peanut butter per cup, and the recipe will yield about 24 mini cups instead of 12 regular ones.